This guide explains how to set up es:scope® with es:prot™. With this setup you can observe, validate, and adjust the behavior of runtime variables in your embedded device under test.
¶ Part 1: Set Up es:prot™
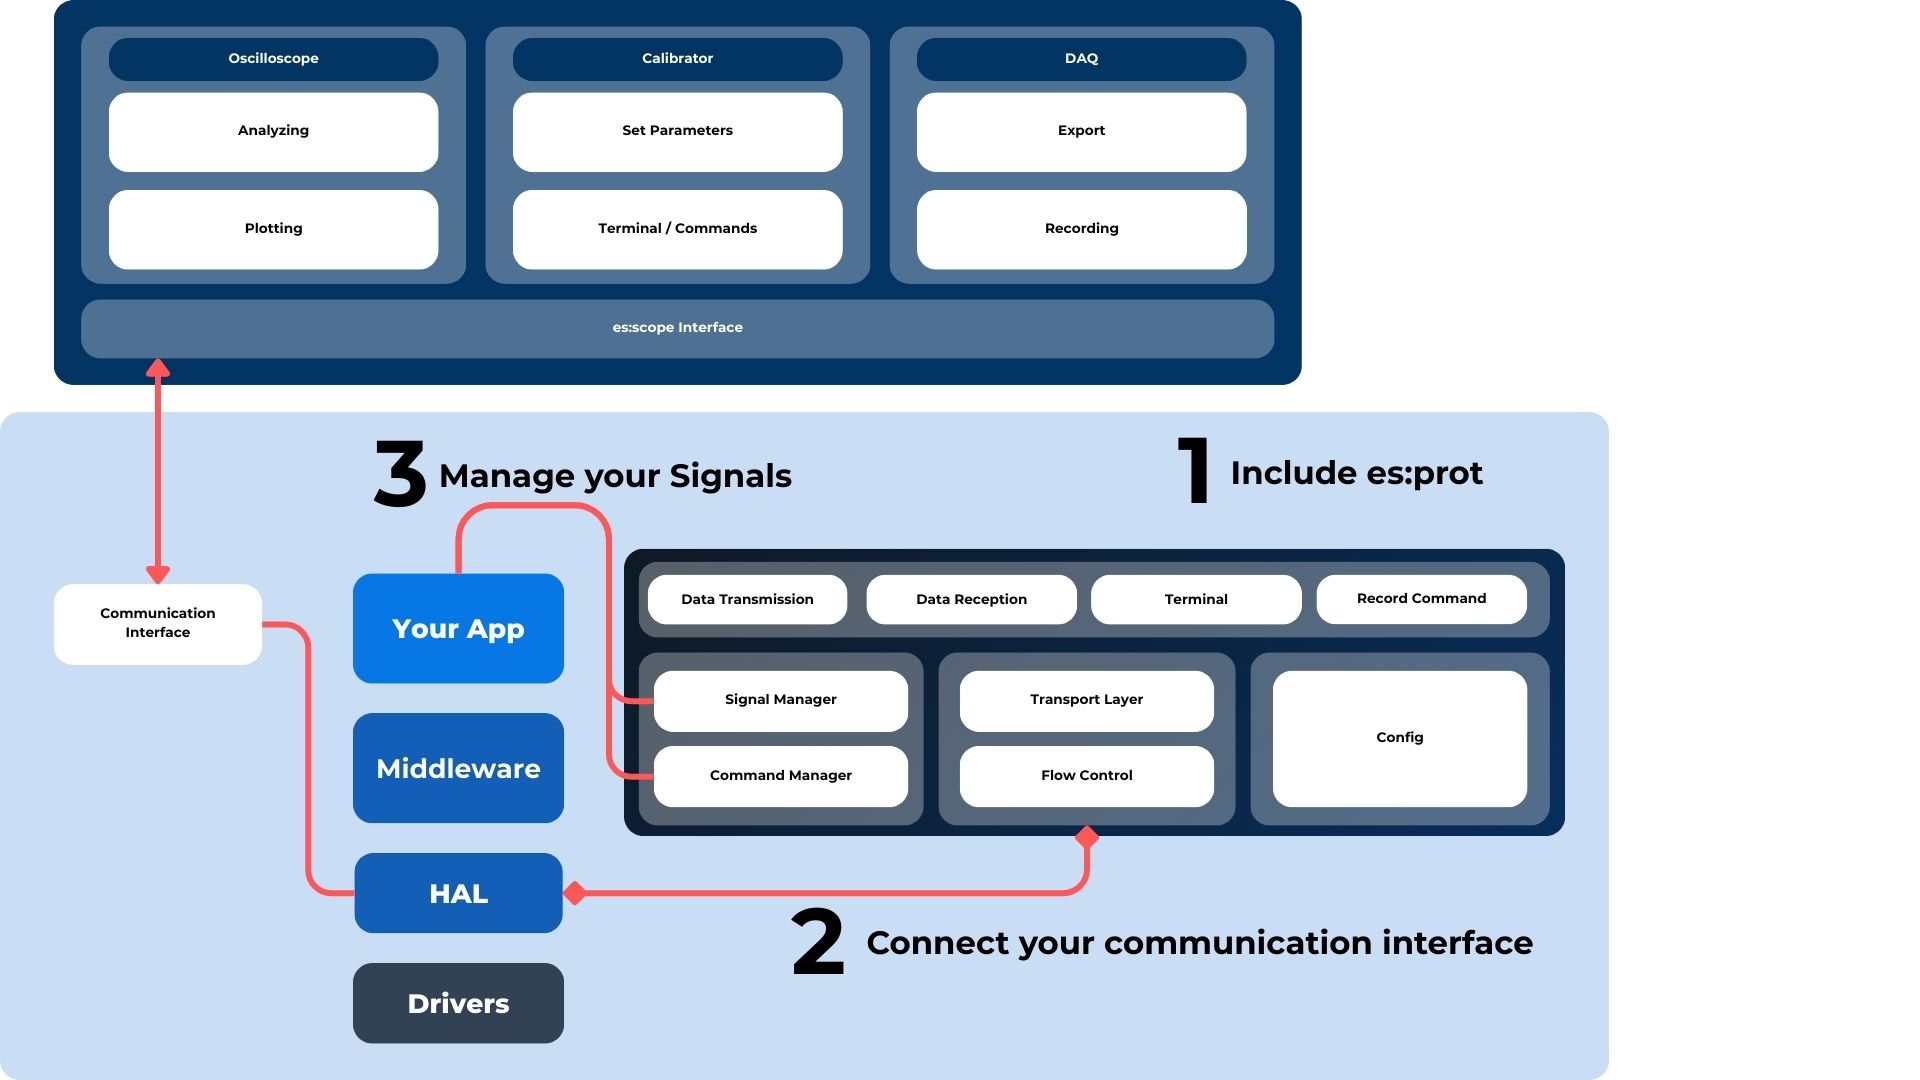
es:prot™ is a C-based middleware solution designed for use with embedded systems. It establishes a connection to the es:scope® software, managing commands, signals and data flow. It is independent of both hardware and communication interfaces.
The middleware enables you to add 'virtual probes' and 'virtual knobs' to your code, which can then be accessed via es:scope®. These enable you to send variables as real-time measurement signals at defined sampling rates, as well as receive parameters and commands for making adjustments during runtime.
Setting es:prot™ up involves three steps:
- Include: Download and include the es:prot™ files
- Connect: Tell es:prot™ how to work with your chosen communication interface
- Manage Signals: Define and transmit signals
¶ 1. Include es:prot
es:prot™ is available as open C code. As it is both hardware- and interface-agnostic, you can simply include it in your project. In step two it is then configured for your chosen interface.
To include it in your project:
- Download the es:prot™ files here.
- Copy them into your project folder.
- Include
es_prot.hin your main source file.
#include "es_prot.h"
The folder structure should look like this:
- /es_prot/
es_prot.hHeader file you have to include in your main application.es_prot_config.hHeader file, where you can configure the protocol preferences.color_def.hHeader file containing color definitions.es_prot.cSource code of the protocol.
¶ 2. Connect Your Communication Interface
¶ Configure the Communication Interface Usage
The configuration tells es:prot™ how to work within your chosen communication interface (e.g., SPI, UART, USB). Using DMA is recommended for performance optimization.
Modify es_prot_config.h with at least these settings:
N_TX_SIGNALSNumber of signals to be transmitted from the embedded system to the computer.N_RX_SIGNALS: Number of signals to be transmitted from the computer to the embedded system.MAX_COMM_BUFFER_DIM: Maximum buffer size in bytes to be allocated for your communication interface.PROCESS_FREQUENCY: Frequency of the process which sends out the data, e.g. a timer-based interrupt routine.COMM_DEV_BAUDRATE: Transmission speed in baud/s of your communication interface.
¶ Interface Setup
es:prot™ is communication interface-agnostic. To use it which your chosen interface, you must supply two functions: one to start a transfer and one to check its status.
es_start_data_transfer()→ Hands transmission and reception buffer pointers to your communication driver.es_get_transfer_status()→ Reports when the data transfer has finished.
Recommended: Use DMA in
es_start_data_transfer()for better performance.
Example (SPI with DMA on an STM32 Microcontroller):
void es_start_data_transfer(uint32_t buffer_size, uint8_t *tx_data_buff, uint8_t *rx_data_buff) {
    HAL_SPI_TransmitReceive_DMA(&hspi3, (uint8_t*) tx_data_buff, (uint8_t*) rx_data_buff, (uint16_t) buffer_size);
};

uint8_t es_get_transfer_status()
{
    if (HAL_SPI_GetState(&hspi3) == HAL_SPI_STATE_READY)
        return  1;
    else
        return 0;
};
¶ 3. Manage Your Signals
es:prot™ does not rely on debug symbols or ELF parsing. Instead, you define signals directly in your code by name, type, and update. You can read from and write to global es:prot™ buffers from any part of your code.
Steps:
- Create a variable of type
es_protto contain these buffers. - Call the initialization
es_prot_init_struct(volatile es_prot*)in yourmain()setup. - Configure the transmission of each signal with
es_prot_set_tx_data_info(). - Configure the reception of each parameter with
es_prot_set_rx_data_info(). - Call the initialization es_prot_init_comm() in your
main()setup.
At runtime, es:prot™ sends a description of all configured signals to es:scope, enabling plug-and-play setups.
Example of a setup (FTDI SPI-USB):
volatile es_prot USB_COMM; 			           // Create a variable of type ’es_prot’. In this example it is called USB_COMM.
void  es_prot_set_tx_data_info(...){...}    // Your function from before
uint8_t  es_get_transfer_status(){...}				 // Your function from before

void main {
  ...
  // Provide your es_prot struct
  es_prot_init_struct(&USB_COMM );
  // Configure all the tx signals you want to use
  es_prot_set_tx_data_info(&USB_COMM,0,SCALING_FACTOR_APPLIED,TYPE_FLOAT,"i_d",PLOT_NR_1,1.0,4,BLACK);
  es_prot_set_tx_data_info(&USB_COMM,1,SCALING_FACTOR_APPLIED,TYPE_FLOAT,"i_q",PLOT_NR_1,1.0,4,BLUE);
  // Configure all the rx signals you want to use
  es_prot_set_rx_data_info(&USB_COMM,0,"gain");
  // Start the communication
  es_prot_init_comm(&USB_COMM);
  ...
 }
¶ Execute Signal Exchange
To exchange the buffers between the middleware and the es:scope® software, you need to call the manager function. Ideally, you should call it in a dedicated timer interrupt, which should run at the frequency defined in es_prot_config.h.
These commands should respect the transmission rates you’ve defined in configuration.
es_prot_manager()→ Transmit the buffers between es:scope® and es:prot
Once initialized, you can use the utilty functions anywhere in your code.
The most important utilities are:
es_prot_write_tx_value()→ Write a signal to the bufferes_prot_get_rx_value()→ Get a parameter from the buffer
uint8_t p_parameter;

void HAL_TIM_PeriodElapsedCallback(TIM_HandleTypeDef *htim)
{
    // Catch the measurements after each PWM cycle
    if (htim == &htim6)
    {
        es_prot_write_tx_value(&USB_COMM, 0, get_i_d());
        es_prot_write_tx_value(&USB_COMM, 1, get_i_q());
        es_prot_manager(&USB_COMM);
        p_parameter = es_prot_get_rx_value(&USB_COMM, 0);
    }
}
¶ Part 2: Set Up es:scope
Once es:prot™ is running on your device, es:scope® lets you connect, configure, and start introspection.
¶ 1. Download, Install and Activate
Download the installer or files (Windows/Linux) and follow the setup process. Visit the download page here.
¶ Activate Your License
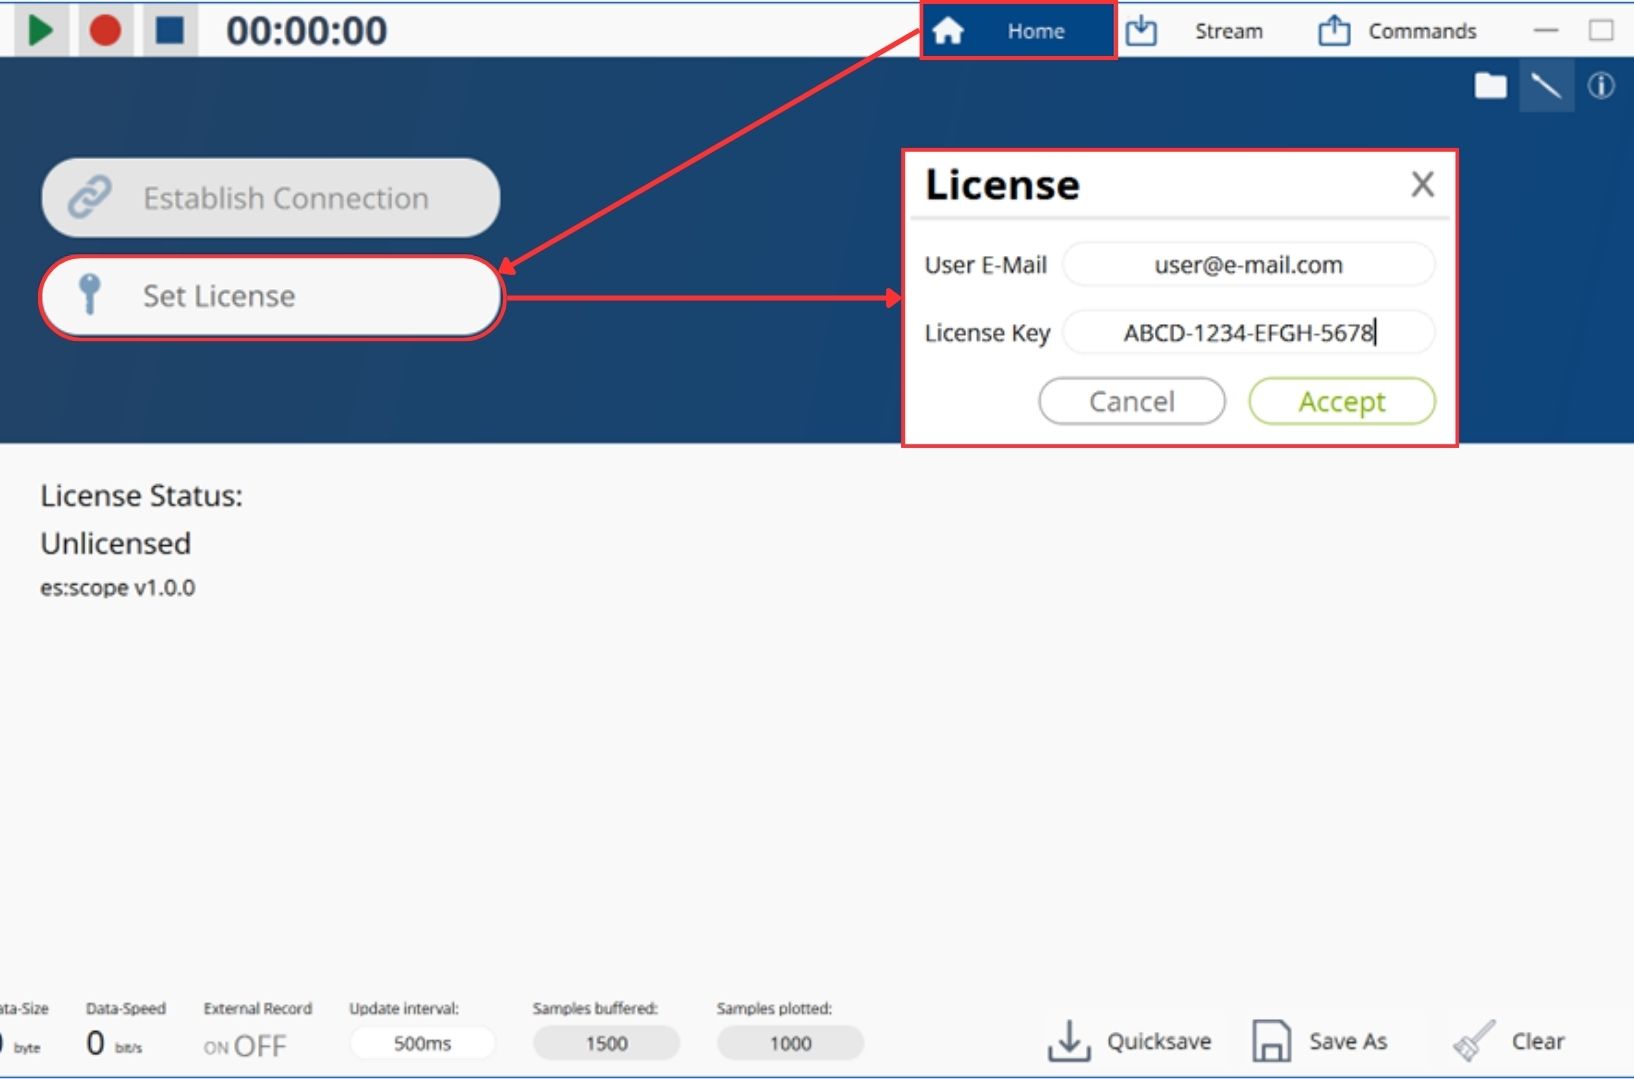
Before using es:scope, activate your license:
- On the Home tab, click Set License.
- Enter your license information.
- Click Accept.
- Your license type will appear under Home/ License Status.
¶ 2. Establish a Connection
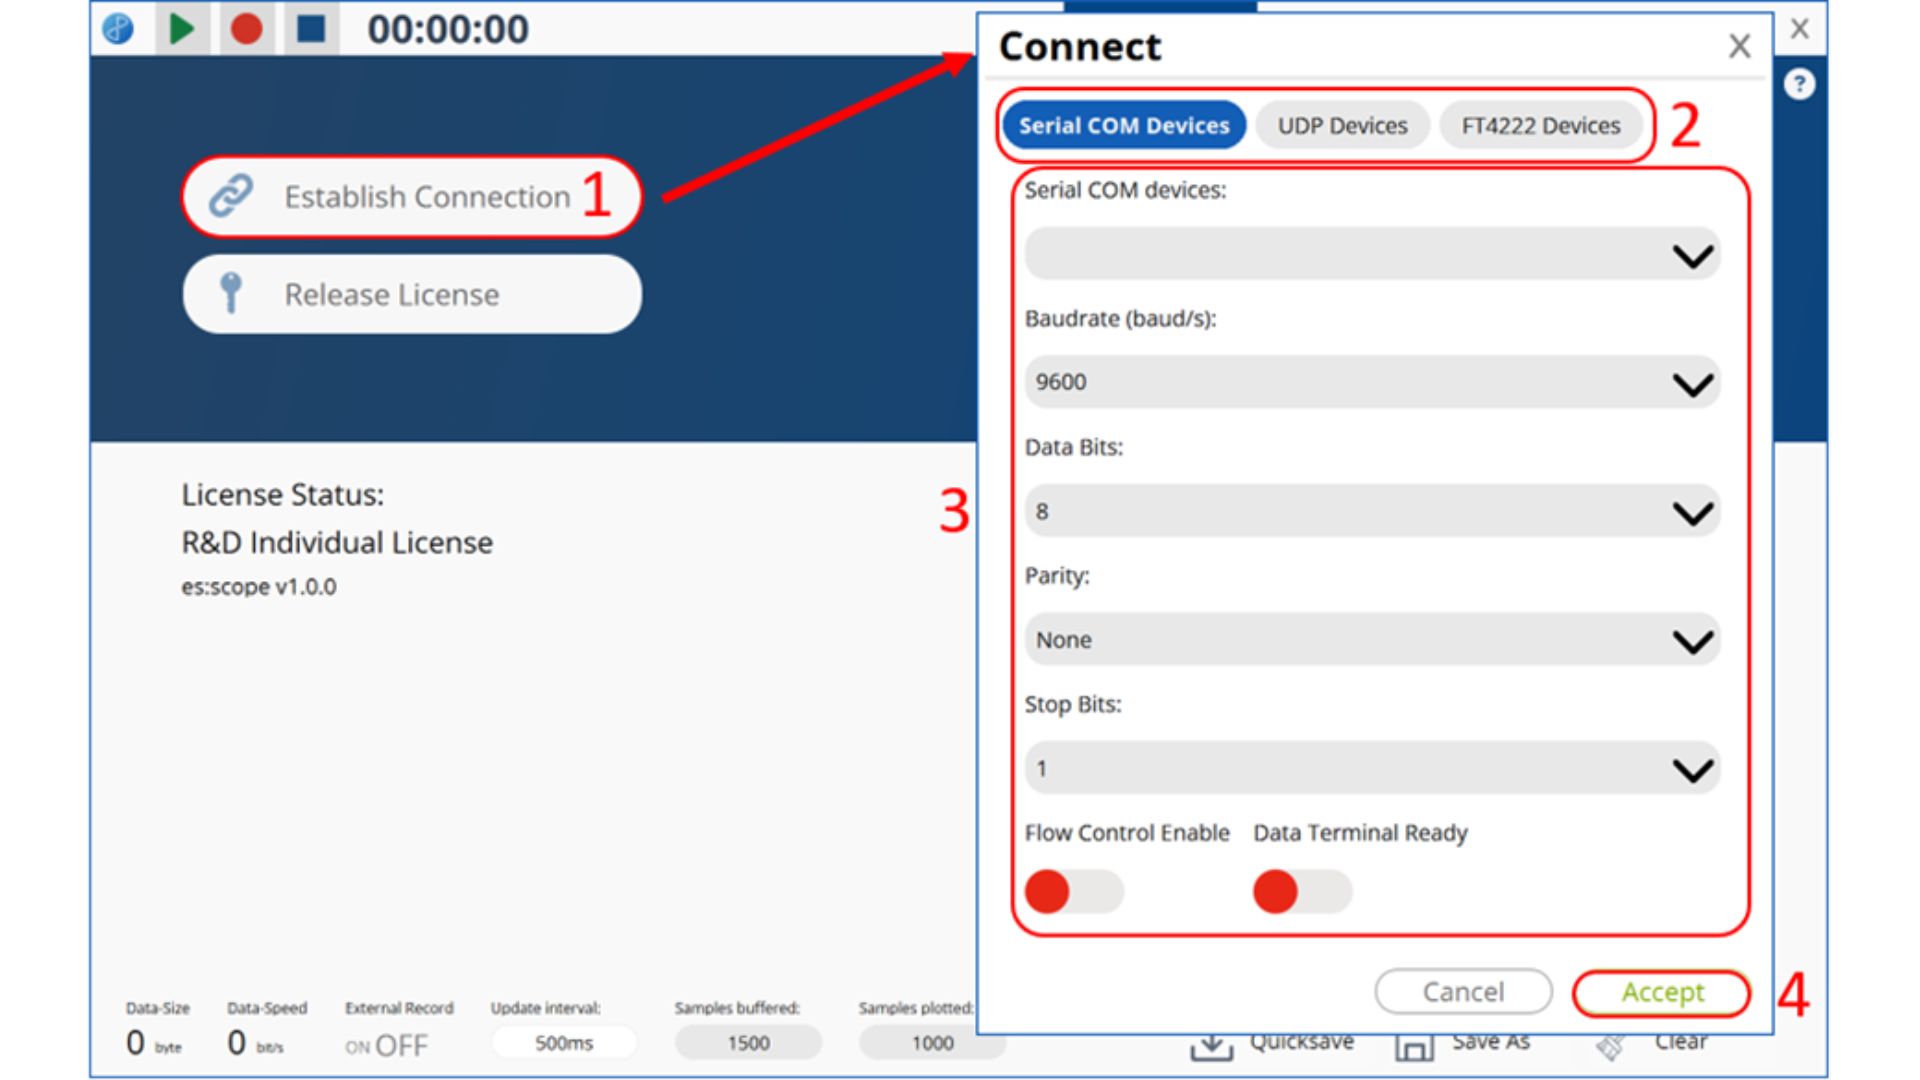
- On the ‘Home’ tab, click ‘Establish Connection’.
- Select your connection type (e.g. Serial, UDP)
- Select the device and adjust the connection settings if applicable.
- Click ‘Accept’ and wait for the connection to be established.
- es:scope® will automatically open predefined plots for plug-and-play use.
¶ 3. Reconfigure Signal Management (Optional)
In es:prot™ the signal management is preconfigured as code. But the signals can also be reconfigured in es:scope.
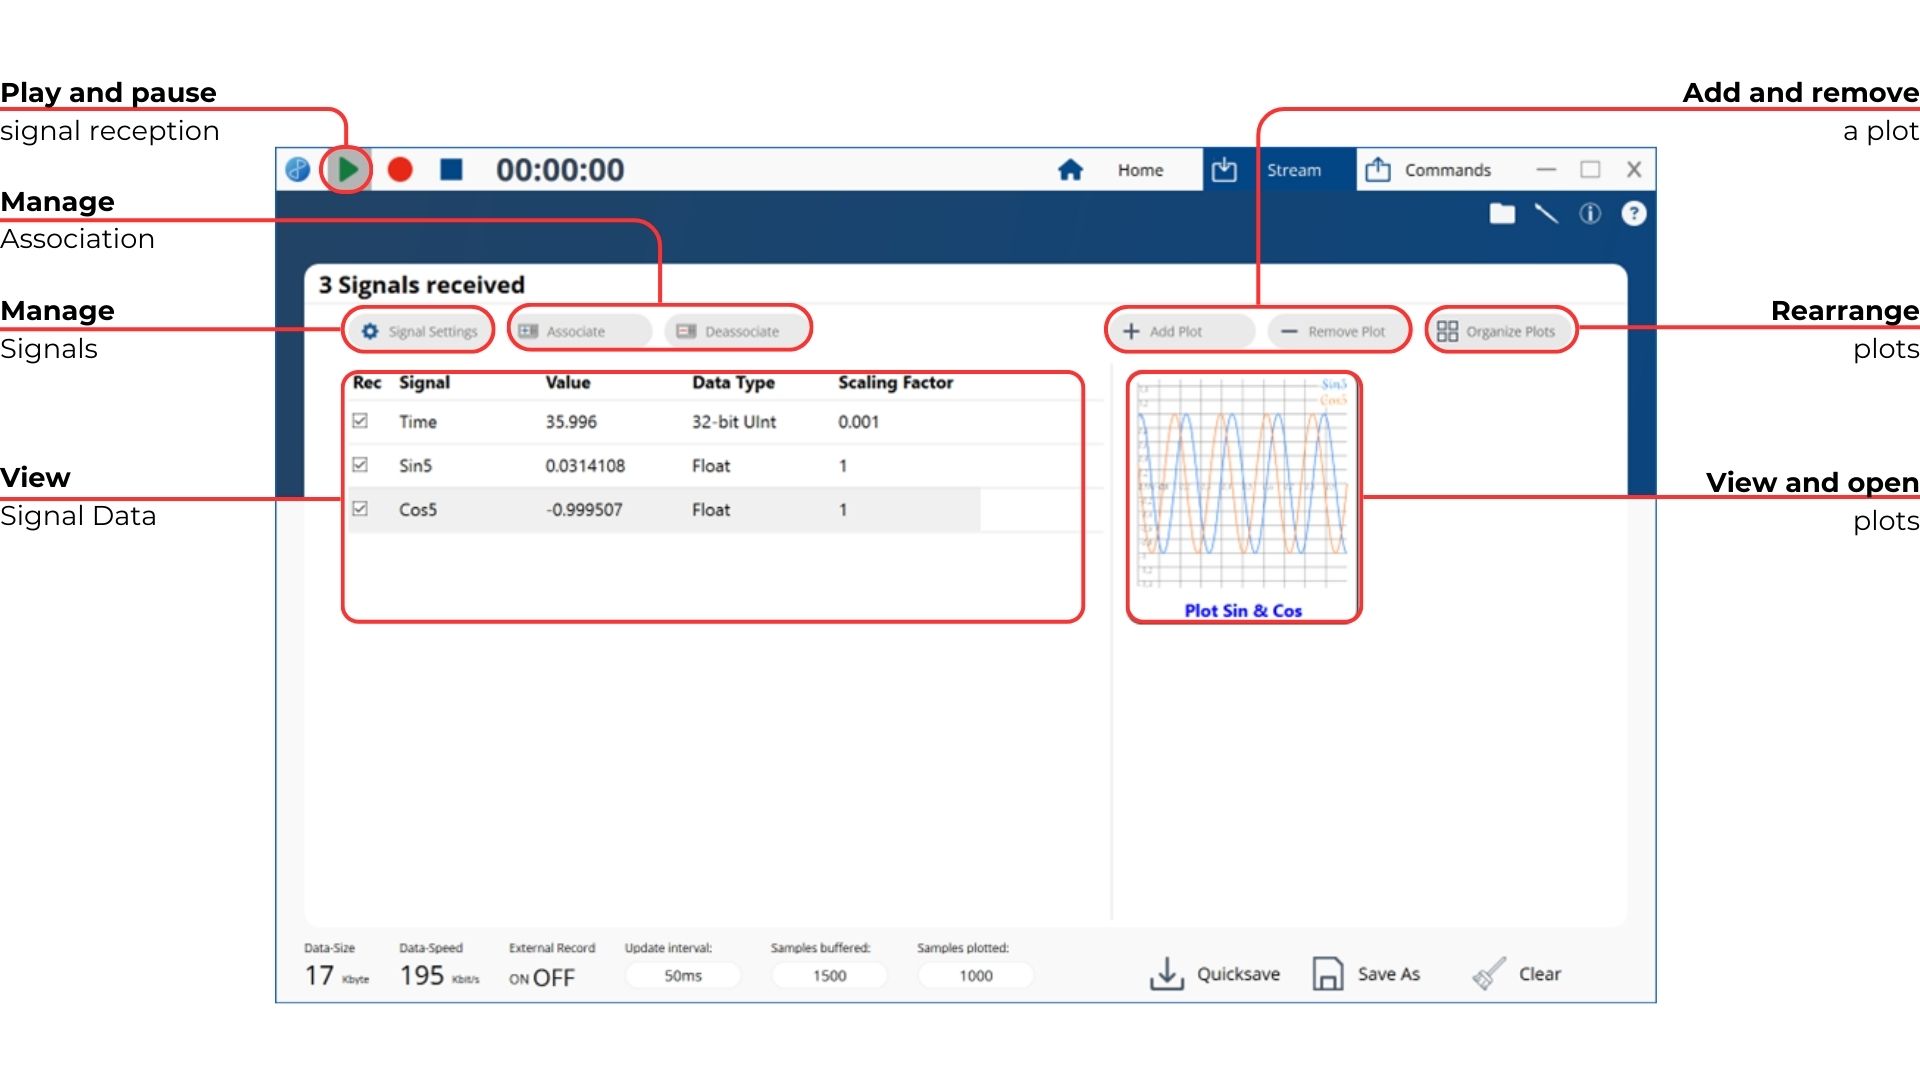
In the stream tab all received signals are shown (left side). They are associated with plots (right side).
The Play/ Pause button on the top left of every window controls the signal reception.
Add a plot window:
- On the ‘Stream’ tab's right side, click ‘Add Plot’.
- Enter the type and name of your plot.
- Click the ‘Accept’ button - the newly created plot will open.
- A thumbnail of the plot is added on the right side of the ‘Stream’ tab.
es:scope® supports signal plots X-Y plots, and FFT plots. Using these plot types is similar to using signal plots with small exceptions:
| Property | Signal plot | X-Y plot | FFT plot |
|---|---|---|---|
| Types | One | One | Amplitude, Power, Power (dB) |
| Association | Single signal | Signal pair | Single signal |
| Statistics | Yes | No | Yes |
Focus a plow window
- A double click on this thumbnail will focus on the plot.
Associate a signal to a plot window
- Click the ‘Associate’ button and select the signal and plot to associate.
- Click ‘Accept’.
Toggle the signal reception active
- Click the Play/ Pause button on the top left of the window.